Gitlab Ci Do You Want to Continue
The author selected the Free and Open Source Fund to receive a donation as part of the Write for DOnations program.
Introduction
GitLab is an open source collaboration platform that provides powerful features beyond hosting a code repository. You can track issues, host packages and registries, maintain Wikis, set up continuous integration (CI) and continuous deployment (CD) pipelines, and more.
In this tutorial you'll build a continuous deployment pipeline with GitLab. You will configure the pipeline to build a Docker image, push it to the GitLab container registry, and deploy it to your server using SSH. The pipeline will run for each commit pushed to the repository.
You will deploy a small, static web page, but the focus of this tutorial is configuring the CD pipeline. The static web page is only for demonstration purposes; you can apply the same pipeline configuration using other Docker images for the deployment as well.
When you have finished this tutorial, you can visit http://your_server_IP in a browser for the results of the automatic deployment.
Prerequisites
To complete this tutorial, you will need:
- One Ubuntu 18.04 server set up by following the Ubuntu 18.04 initial server setup guide, including a sudo non-root user and a firewall. You need at least 1 GB RAM and 1 CPU.
- Docker installed on the server by following the How To Install and Use Docker on Ubuntu 18.04 guide.
- A user account on a GitLab instance with an enabled container registry. The free plan of the official GitLab instance meets the requirements. You can also host your own GitLab instance by following the How To Install and Configure GitLab on Ubuntu 18.04 guide.
Step 1 — Creating the GitLab Repository
Let's start by creating a GitLab project and adding an HTML file to it. You will later copy the HTML file into an Nginx Docker image, which in turn you'll deploy to the server.
Log in to your GitLab instance and click New project.

- Give it a proper Project name.
- Optionally add a Project description.
- Make sure to set the Visibility Level to Private or Public depending on your requirements.
- Finally click Create project

You will be redirected to the Project's overview page.
Let's create the HTML file. On your Project's overview page, click New file.

Set the File name to index.html and add the following HTML to the file body:
index.html
<html > <body > <h1 > My Personal Website </h1 > </body > </html > Click Commit changes at the bottom of the page to create the file.
This HTML will produce a blank page with one headline showing My Personal Website when opened in a browser.
Dockerfiles are recipes used by Docker to build Docker images. Let's create a Dockerfile to copy the HTML file into an Nginx image.
Go back to the Project's overview page, click the + button and select the New file option.

Set the File name to Dockerfile and add these instructions to the file body:
Dockerfile
FROM nginx:1.18 COPY index.html /usr/share/nginx/html The FROM instruction specifies the image to inherit from—in this case the nginx:1.18 image. 1.18 is the image tag representing the Nginx version. The nginx:latest tag references the latest Nginx release, but that could break your application in the future, which is why fixed versions are recommended.
The COPY instruction copies the index.html file to /usr/share/nginx/html in the Docker image. This is the directory where Nginx stores static HTML content.
Click Commit changes at the bottom of the page to create the file.
In the next step, you'll configure a GitLab runner to keep control of who gets to execute the deployment job.
Step 2 — Registering a GitLab Runner
In order to keep track of the environments that will have contact with the SSH private key, you'll register your server as a GitLab runner.
In your deployment pipeline you want to log in to your server using SSH. To achieve this, you'll store the SSH private key in a GitLab CI/CD variable (Step 5). The SSH private key is a very sensitive piece of data, because it is the entry ticket to your server. Usually, the private key never leaves the system it was generated on. In the usual case, you would generate an SSH key on your host machine, then authorize it on the server (that is, copy the public key to the server) in order to log in manually and perform the deployment routine.
Here the situation changes slightly: You want to grant an autonomous authority (GitLab CI/CD) access to your server to automate the deployment routine. Therefore the private key needs to leave the system it was generated on and be given in trust to GitLab and other involved parties. You never want your private key to enter an environment that is not either controlled or trusted by you.
Besides GitLab, the GitLab runner is yet another system that your private key will enter. For each pipeline, GitLab uses runners to perform the heavy work, that is, execute the jobs you have specified in the CI/CD configuration. That means the deployment job will ultimately be executed on a GitLab runner, hence the private key will be copied to the runner such that it can log in to the server using SSH.
If you use unknown GitLab Runners (for example, shared runners) to execute the deployment job, then you'd be unaware of the systems getting in contact with the private key. Even though GitLab runners clean up all data after job execution, you can avoid sending the private key to unknown systems by registering your own server as a GitLab runner. The private key will then be copied to the server controlled by you.
Start by logging in to your server:
- ssh sammy@your_server_IP
In order to install the gitlab-runner service, you'll add the official GitLab repository. Download and inspect the install script:
- curl -L https://packages.gitlab.com/install/repositories/runner/gitlab-runner/script.deb.sh > script.deb.sh
- less script.deb.sh
Once you are satisfied with the safety of the script, run the installer:
- sudo bash script.deb.sh
It may not be obvious, but you have to enter your non-root user's password to proceed. When you execute the previous command, the output will be like:
Output
[sudo] password for sammy: % Total % Received % Xferd Average Speed Time Time Time Current Dload Upload Total Spent Left Speed 100 5945 100 5945 0 0 8742 0 --:--:-- --:--:-- --:--:-- 8729 When the curl command finishes, you will receive the following message:
Output
The repository is setup! You can now install packages. Next install the gitlab-runner service:
- sudo apt install gitlab-runner
Verify the installation by checking the service status:
- systemctl status gitlab-runner
You will have active (running) in the output:
Output
● gitlab-runner.service - GitLab Runner Loaded: loaded (/etc/systemd/system/gitlab-runner.service; enabled; vendor preset: enabled) Active: active (running) since Mon 2020-06-01 09:01:49 UTC; 4s ago Main PID: 16653 (gitlab-runner) Tasks: 6 (limit: 1152) CGroup: /system.slice/gitlab-runner.service └─16653 /usr/lib/gitlab-runner/gitlab-runner run --working-directory /home/gitlab-runner --config /etc/gitla To register the runner, you need to get the project token and the GitLab URL:
- In your GitLab project, navigate to Settings > CI/CD > Runners.
- In the Set up a specific Runner manually section, you'll find the registration token and the GitLab URL. Copy both to a text editor; you'll need them for the next command. They will be referred to as
https://your_gitlab.comandproject_token.

Back to your terminal, register the runner for your project:
- sudo gitlab-runner register -n --url https://your_gitlab.com --registration-token project_token --executor docker --description "Deployment Runner" --docker-image "docker:stable" --tag-list deployment --docker-privileged
The command options can be interpreted as follows:
-
-nexecutes theregistercommand non-interactively (we specify all parameters as command options). -
--urlis the GitLab URL you copied from the runners page in GitLab. -
--registration-tokenis the token you copied from the runners page in GitLab. -
--executoris the executor type.dockerexecutes each CI/CD job in a Docker container (see GitLab's documentation on executors). -
--descriptionis the runner's description, which will show up in GitLab. -
--docker-imageis the default Docker image to use in CI/CD jobs, if not explicitly specified. -
--tag-listis a list of tags assigned to the runner. Tags can be used in a pipeline configuration to select specific runners for a CI/CD job. Thedeploymenttag will allow you to refer to this specific runner to execute the deployment job. -
--docker-privilegedexecutes the Docker container created for each CI/CD job in privileged mode. A privileged container has access to all devices on the host machine and has nearly the same access to the host as processes running outside containers (see Docker's documentation about runtime privilege and Linux capabilities). The reason for running in privileged mode is so you can use Docker-in-Docker (dind) to build a Docker image in your CI/CD pipeline. It is good practice to give a container the minimum requirements it needs. For you it is a requirement to run in privileged mode in order to use Docker-in-Docker. Be aware, you registered the runner for this specific project only, where you are in control of the commands being executed in the privileged container.
After executing the gitlab-runner register command, you will receive the following output:
Output
Runner registered successfully. Feel free to start it, but if it's running already the config should be automatically reloaded! Verify the registration process by going to Settings > CI/CD > Runners in GitLab, where the registered runner will show up.

In the next step you'll create a deployment user.
Step 3 — Creating a Deployment User
You are going to create a user that is dedicated for the deployment task. You will later configure the CI/CD pipeline to log in to the server with that user.
On your server, create a new user:
- sudo adduser deployer
You'll be guided through the user creation process. Enter a strong password and optionally any further user information you want to specify. Finally confirm the user creation with Y.
Add the user to the Docker group:
- sudo usermod -aG docker deployer
This permits deployer to execute the docker command, which is required to perform the deployment.
In the next step you'll create an SSH key to be able to log in to the server as deployer.
Step 4 — Setting Up an SSH Key
You are going to create an SSH key for the deployment user. GitLab CI/CD will later use the key to log in to the server and perform the deployment routine.
Let's start by switching to the newly created deployer user for whom you'll generate the SSH key:
- su deployer
You'll be prompted for the deployer password to complete the user switch.
Next, generate a 4096-bit SSH key. It is important to answer the questions of the ssh-keygen command correctly:
- First question: answer it with
ENTER, which stores the key in the default location (the rest of this tutorial assumes the key is stored in the default location). - Second question: configures a password to protect the SSH private key (the key used for authentication). If you specify a passphrase, you'll have to enter it each time the private key is used. In general, a passphrase adds another security layer to SSH keys, which is good practice. Somebody in possession of the private key would also require the passphrase to use the key. For the purposes of this tutorial, it is important that you have an empty passphrase, because the CI/CD pipeline will execute non-interactively and therefore does not allow to enter a passphrase.
To summarize, run the following command and confirm both questions with ENTER to create a 4096-bit SSH key and store it in the default location with an empty passphrase:
- ssh-keygen -b 4096
To authorize the SSH key for the deployer user, you need to append the public key to the authorized_keys file:
- cat ~/.ssh/id_rsa.pub >> ~/.ssh/authorized_keys
~ is short for the user home in Linux. The cat program will print the contents of a file; here you use the >> operator to redirect the output of cat and append it to the authorized_keys file.
In this step you have created an SSH key pair for the CI/CD pipeline to log in and deploy the application. Next you'll store the private key in GitLab to make it accessible during the pipeline process.
Step 5 — Storing the Private Key in a GitLab CI/CD Variable
You are going to store the SSH private key in a GitLab CI/CD file variable, so that the pipeline can make use of the key to log in to the server.
When GitLab creates a CI/CD pipeline, it will send all variables to the corresponding runner and the variables will be set as environment variables for the duration of the job. In particular, the values of file variables are stored in a file and the environment variable will contain the path to this file.
While you're in the variables section, you'll also add a variable for the server IP and the server user, which will inform the pipeline about the destination server and user to log in.
Start by showing the SSH private key:
- cat ~/.ssh/id_rsa
Copy the output to your clipboard. Make sure to add a linebreak after -----END RSA PRIVATE KEY-----:
~/.ssh/id_rsa
-----BEGIN RSA PRIVATE KEY----- ... -----END RSA PRIVATE KEY----- Now navigate to Settings > CI / CD > Variables in your GitLab project and click Add Variable. Fill out the form as follows:
- Key:
ID_RSA - Value: Paste your SSH private key from your clipboard (including a line break at the end).
- Type: File
- Environment Scope: All (default)
- Protect variable: Checked
- Mask variable: Unchecked
Note: The variable can't be masked because it does not meet the regular expression requirements (see GitLab's documentation about masked variables). However, the private key will never appear in the console log, which makes masking it obsolete.
A file containing the private key will be created on the runner for each CI/CD job and its path will be stored in the $ID_RSA environment variable.
Create another variable with your server IP. Click Add Variable and fill out the form as follows:
- Key:
SERVER_IP - Value:
your_server_IP - Type: Variable
- Environment scope: All (default)
- Protect variable: Checked
- Mask variable: Checked
Finally, create a variable with the login user. Click Add Variable and fill out the form as follows:
- Key:
SERVER_USER - Value:
deployer - Type: Variable
- Environment scope: All (default)
- Protect variable: Checked
- Mask variable: Checked
You have now stored the private key in a GitLab CI/CD variable, which makes the key available during pipeline execution. In the next step, you're moving on to configuring the CI/CD pipeline.
Step 6 — Configuring the .gitlab-ci.yml File
You are going to configure the GitLab CI/CD pipeline. The pipeline will build a Docker image and push it to the container registry. GitLab provides a container registry for each project. You can explore the container registry by going to Packages & Registries > Container Registry in your GitLab project (read more in GitLab's container registry documentation.) The final step in your pipeline is to log in to your server, pull the latest Docker image, remove the old container, and start a new container.
Now you're going to create the .gitlab-ci.yml file that contains the pipeline configuration. In GitLab, go to the Project overview page, click the + button and select New file. Then set the File name to .gitlab-ci.yml.
(Alternatively you can clone the repository and make all following changes to .gitlab-ci.yml on your local machine, then commit and push to the remote repository.)
To begin add the following:
.gitlab-ci.yml
stages : - publish - deploy Each job is assigned to a stage. Jobs assigned to the same stage run in parallel (if there are enough runners available). Stages will be executed in the order they were specified. Here, the publish stage will go first and the deploy stage second. Successive stages only start when the previous stage finished successfully (that is, all jobs have passed). Stage names can be chosen arbitrarily.
When you want to combine this CD configuration with your existing CI pipeline, which tests and builds the app, you may want to add the publish and deploy stages after your existing stages, such that the deployment only takes place if the tests passed.
Following this, add this to your .gitlab-ci.yml file:
.gitlab-ci.yml
. . . variables : TAG_LATEST : $CI_REGISTRY_IMAGE/$CI_COMMIT_REF_NAME:latest TAG_COMMIT : $CI_REGISTRY_IMAGE/$CI_COMMIT_REF_NAME:$CI_COMMIT_SHORT_SHA The variables section defines environment variables that will be available in the context of a job's script section. These variables will be available as usual Linux environment variables; that is, you can reference them in the script by prefixing with a dollar sign such as $TAG_LATEST. GitLab creates some predefined variables for each job that provide context specific information, such as the branch name or the commit hash the job is working on (read more about predefined variable). Here you compose two environment variables out of predefined variables. They represent:
-
CI_REGISTRY_IMAGE: Represents the URL of the container registry tied to the specific project. This URL depends on the GitLab instance. For example, registry URLs for gitlab.com projects follow the pattern:registry.gitlab.com/your_user/your_project. But since GitLab will provide this variable, you do not need to know the exact URL. -
CI_COMMIT_REF_NAME: The branch or tag name for which project is built. -
CI_COMMIT_SHORT_SHA: The first eight characters of the commit revision for which the project is built.
Both of the variables are composed of predefined variables and will be used to tag the Docker image.
TAG_LATEST will add the latest tag to the image. This is a common strategy to provide a tag that always represents the latest release. For each deployment, the latest image will be overridden in the container registry with the newly built Docker image.
TAG_COMMIT, on the other hand, uses the first eight characters of the commit SHA being deployed as the image tag, thereby creating a unique Docker image for each commit. You will be able to trace the history of Docker images down to the granularity of Git commits. This is a common technique when doing continuous deployments, because it allows you to quickly deploy an older version of the code in case of a defective deployment.
As you'll explore in the coming steps, the process of rolling back a deployment to an older Git revision can be done directly in GitLab.
$CI_REGISTRY_IMAGE/$CI_COMMIT_REF_NAME specifies the Docker image base name. According to GitLab's documentation, a Docker image name has to follow this scheme:
image name scheme
<registry URL>/<namespace>/<project>/<image> $CI_REGISTRY_IMAGE represents the <registry URL>/<namespace>/<project> part and is mandatory because it is the project's registry root. $CI_COMMIT_REF_NAME is optional but useful to host Docker images for different branches. In this tutorial you will only work with one branch, but it is good to build an extendable structure. In general, there are three levels of image repository names supported by GitLab:
repository name levels
registry.example.com/group/project:some-tag registry.example.com/group/project/image:latest registry.example.com/group/project/my/image:rc1 For your TAG_COMMIT variable you used the second option, where image will be replaced with the branch name.
Next, add the following to your .gitlab-ci.yml file:
.gitlab-ci.yml
. . . publish : image : docker:latest stage : publish services : - docker:dind script : - docker build -t $TAG_COMMIT -t $TAG_LATEST . - docker login -u gitlab-ci-token -p $CI_BUILD_TOKEN $CI_REGISTRY - docker push $TAG_COMMIT - docker push $TAG_LATEST The publish section is the first job in your CI/CD configuration. Let's break it down:
-
imageis the Docker image to use for this job. The GitLab runner will create a Docker container for each job and execute the script within this container.docker:latestimage ensures that thedockercommand will be available. -
stageassigns the job to thepublishstage. -
servicesspecifies Docker-in-Docker—thedindservice. This is the reason why you registered the GitLab runner in privileged mode.
The script section of the publish job specifies the shell commands to execute for this job. The working directory will be set to the repository root when these commands will be executed.
-
docker build ...: Builds the Docker image based on theDockerfileand tags it with the latest commit tag defined in the variables section. -
docker login ...: Logs Docker in to the project's container registry. You use the predefined variable$CI_BUILD_TOKENas an authentication token. GitLab will generate the token and stay valid for the job's lifetime. -
docker push ...: Pushes both image tags to the container registry.
Following this, add the deploy job to your .gitlab-ci.yml:
.gitlab-ci.yml
. . . deploy : image : alpine:latest stage : deploy tags : - deployment script : - chmod og= $ID_RSA - apk update && apk add openssh-client - ssh -i $ID_RSA -o StrictHostKeyChecking=no $SERVER_USER@$SERVER_IP "docker login -u gitlab-ci-token -p $CI_BUILD_TOKEN $CI_REGISTRY" - ssh -i $ID_RSA -o StrictHostKeyChecking=no $SERVER_USER@$SERVER_IP "docker pull $TAG_COMMIT" - ssh -i $ID_RSA -o StrictHostKeyChecking=no $SERVER_USER@$SERVER_IP "docker container rm -f my-app | | true" - ssh -i $ID_RSA -o StrictHostKeyChecking=no $SERVER_USER@$SERVER_IP "docker run -d -p 80:80 - -name my-app $TAG_COMMIT" Alpine is a lightweight Linux distribution and is sufficient as a Docker image here. You assign the job to the deploy stage. The deployment tag ensures that the job will be executed on runners that are tagged deployment, such as the runner you configured in Step 2.
The script section of the deploy job starts with two configurative commands:
-
chmod og= $ID_RSA: Revokes all permissions for group and others from the private key, such that only the owner can use it. This is a requirement, otherwise SSH refuses to work with the private key. -
apk update && apk add openssh-client: Updates Alpine's package manager (apk) and installs theopenssh-client, which provides thesshcommand.
Four consecutive ssh commands follow. The pattern for each is:
ssh connect pattern for all deployment commands
ssh -i $ID_RSA -o StrictHostKeyChecking=no $SERVER_USER@$SERVER_IP "command" In each ssh statement you are executing command on the remote server. To do so, you authenticate with your private key.
The options are as follows:
-
-istands for identity file and$ID_RSAis the GitLab variable containing the path to the private key file. -
-o StrictHostKeyChecking=nomakes sure to bypass the question, whether or not you trust the remote host. This question can not be answered in a non-interactive context such as the pipeline. -
$SERVER_USERand$SERVER_IPare the GitLab variables you created in Step 5. They specify the remote host and login user for the SSH connection. -
commandwill be executed on the remote host.
The deployment ultimately takes place by executing these four commands on your server:
-
docker login ...: Logs Docker in to the container registry. -
docker pull ...: Pulls the latest image from the container registry. -
docker container rm ...: Deletes the existing container if it exists.|| truemakes sure that the exit code is always successful, even if there was no container running by the namemy-app. This guarantees a delete if exists routine without breaking the pipeline when the container does not exist (for example, for the first deployment). -
docker run ...: Starts a new container using the latest image from the registry. The container will be namedmy-app. Port80on the host will be bound to port80of the container (the order is-p host:container).-dstarts the container in detached mode, otherwise the pipeline would be stuck waiting for the command to terminate.
Note: It may seem odd to use SSH to run these commands on your server, considering the GitLab runner that executes the commands is the exact same server. Yet it is required, because the runner executes the commands in a Docker container, thus you would deploy inside the container instead of the server if you'd execute the commands without the use of SSH. One could argue that instead of using Docker as a runner executor, you could use the shell executor to run the commands on the host itself. But, that would create a constraint to your pipeline, namely that the runner has to be the same server as the one you want to deploy to. This is not a sustainable and extensible solution because one day you may want to migrate the application to a different server or use a different runner server. In any case it makes sense to use SSH to execute the deployment commands, may it be for technical or migration-related reasons.
Let's move on by adding this to the deployment job in your .gitlab-ci.yml:
.gitlab-ci.yml
. . . deploy : . . . environment : name : production url : http://your_server_IP only : - master GitLab environments allow you to control the deployments within GitLab. You can examine the environments in your GitLab project by going to Operations > Environments. If the pipeline did not finish yet, there will be no environment available, as no deployment took place so far.
When a pipeline job defines an environment section, GitLab will create a deployment for the given environment (here production) each time the job successfully finishes. This allows you to trace all the deployments created by GitLab CI/CD. For each deployment you can see the related commit and the branch it was created for.
There is also a button available for re-deployment that allows you to rollback to an older version of the software. The URL that was specified in the environment section will be opened when clicking the View deployment button.
The only section defines the names of branches and tags for which the job will run. By default, GitLab will start a pipeline for each push to the repository and run all jobs (provided that the .gitlab-ci.yml file exists). The only section is one option of restricting job execution to certain branches/tags. Here you want to execute the deployment job for the master branch only. To define more complex rules on whether a job should run or not, have a look at the rules syntax.
Note: In October 2020, GitHub has changed its naming convention for the default branch from master to main. Other providers such as GitLab and the developer community in general are starting to follow this approach. The term master branch is used in this tutorial to denote the default branch for which you may have a different name.
Your complete .gitlab-ci.yml file will look like the following:
.gitlab-ci.yml
stages : - publish - deploy variables : TAG_LATEST : $CI_REGISTRY_IMAGE/$CI_COMMIT_REF_NAME:latest TAG_COMMIT : $CI_REGISTRY_IMAGE/$CI_COMMIT_REF_NAME:$CI_COMMIT_SHORT_SHA publish : image : docker:latest stage : publish services : - docker:dind script : - docker build -t $TAG_COMMIT -t $TAG_LATEST . - docker login -u gitlab-ci-token -p $CI_BUILD_TOKEN $CI_REGISTRY - docker push $TAG_COMMIT - docker push $TAG_LATEST deploy : image : alpine:latest stage : deploy tags : - deployment script : - chmod og= $ID_RSA - apk update && apk add openssh-client - ssh -i $ID_RSA -o StrictHostKeyChecking=no $SERVER_USER@$SERVER_IP "docker login -u gitlab-ci-token -p $CI_BUILD_TOKEN $CI_REGISTRY" - ssh -i $ID_RSA -o StrictHostKeyChecking=no $SERVER_USER@$SERVER_IP "docker pull $TAG_COMMIT" - ssh -i $ID_RSA -o StrictHostKeyChecking=no $SERVER_USER@$SERVER_IP "docker container rm -f my-app | | true" - ssh -i $ID_RSA -o StrictHostKeyChecking=no $SERVER_USER@$SERVER_IP "docker run -d -p 80:80 - -name my-app $TAG_COMMIT" environment : name : production url : http://your_server_IP only : - master Finally click Commit changes at the bottom of the page in GitLab to create the .gitlab-ci.yml file. Alternatively, when you have cloned the Git repository locally, commit and push the file to the remote.
You've created a GitLab CI/CD configuration for building a Docker image and deploying it to your server. In the next step you are validating the deployment.
Step 7 — Validating the Deployment
Now you'll validate the deployment in various places of GitLab as well as on your server and in a browser.
When a .gitlab-ci.yml file is pushed to the repository, GitLab will automatically detect it and start a CI/CD pipeline. At the time you created the .gitlab-ci.yml file, GitLab started the first pipeline.
Go to CI/CD > Pipelines in your GitLab project to see the pipeline's status. If the jobs are still running/pending, wait until they are complete. You will see a Passed pipeline with two green checkmarks, denoting that the publish and deploy job ran successfully.

Let's examine the pipeline. Click the passed button in the Status column to open the pipeline's overview page. You will get an overview of general information such as:
- Execution duration of the whole pipeline.
- For which commit and branch the pipeline was executed.
- Related merge requests. If there is an open merge request for the branch in charge, it would show up here.
- All jobs executed in this pipeline as well as their status.
Next click the deploy button to open the result page of the deploy job.
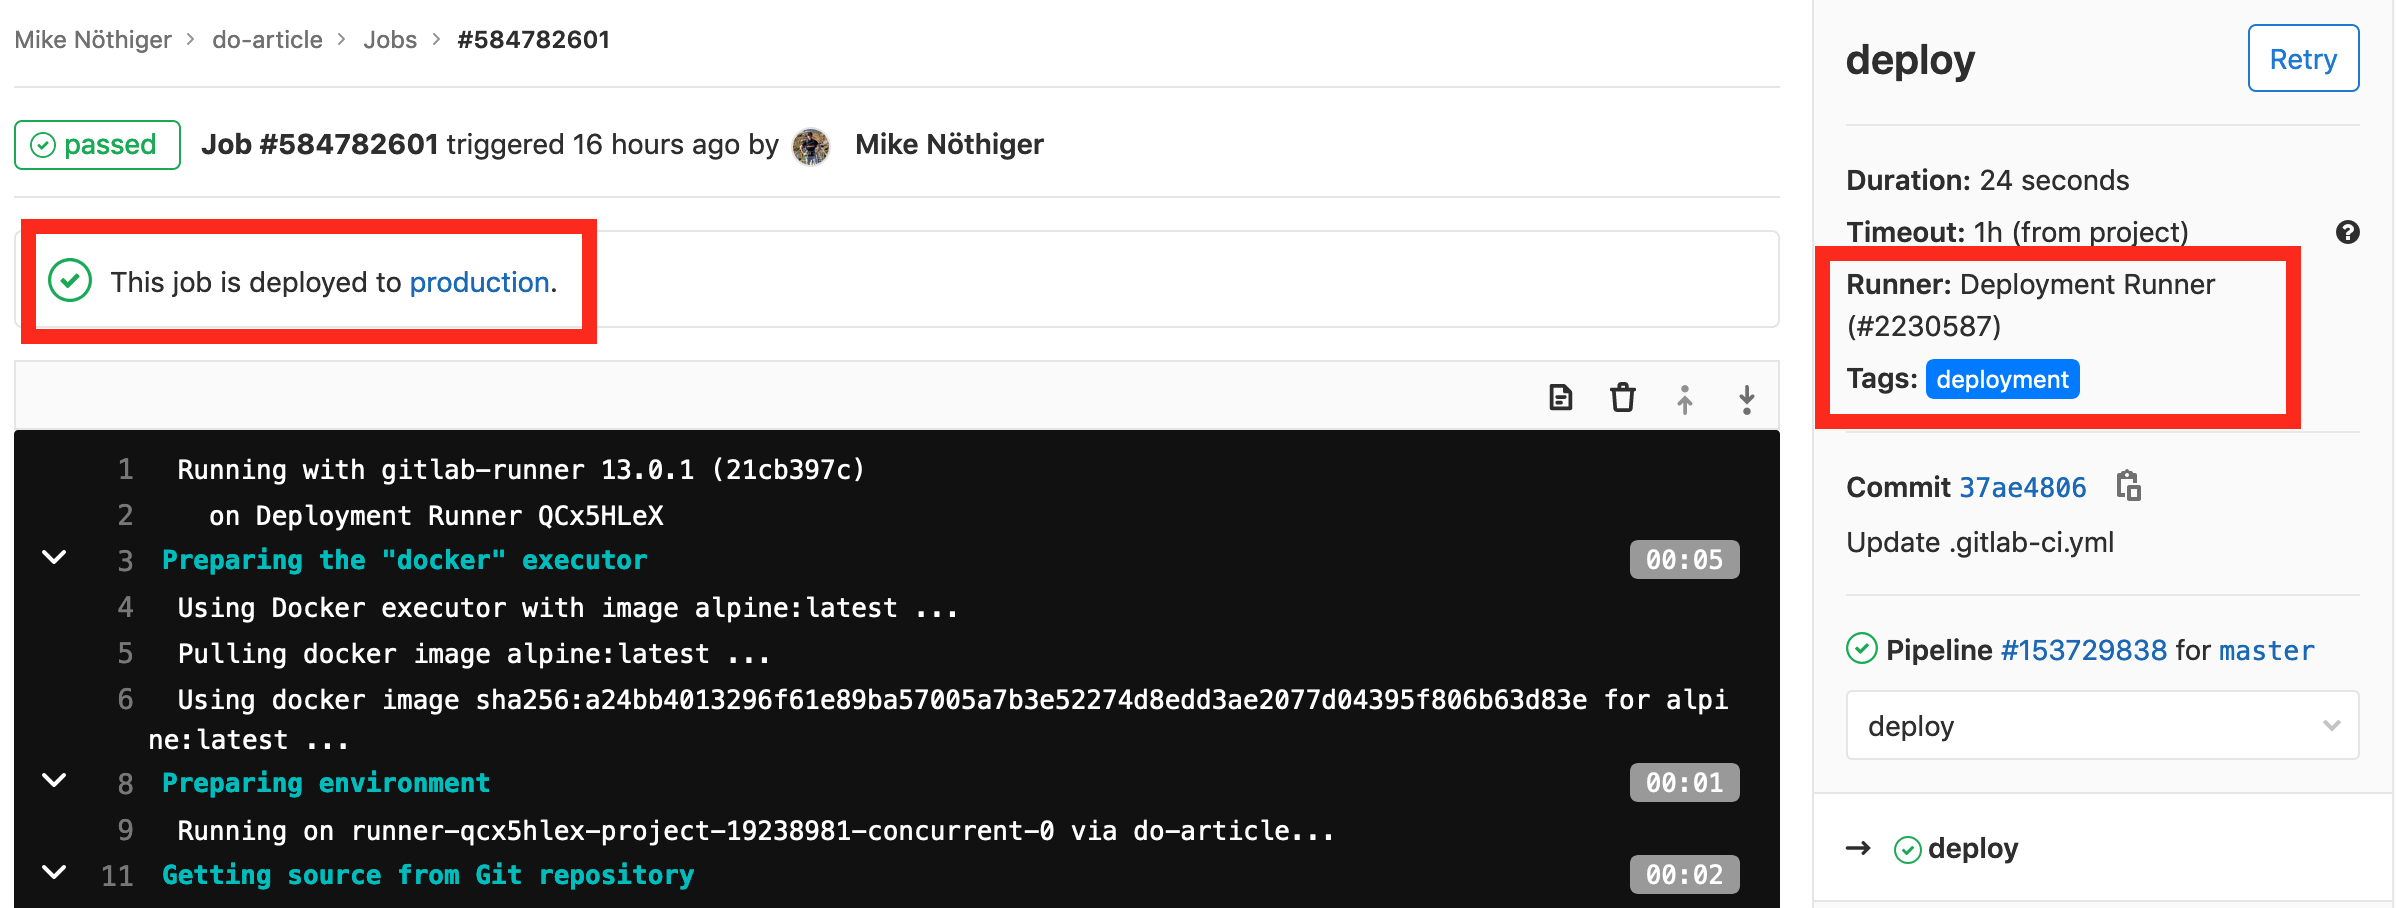
On the job result page you can see the shell output of the job's script. This is the place to look for when debugging a failed pipeline. In the right sidebar you'll find the deployment tag you added to this job, and that it was executed on your Deployment Runner.
If you scroll to the top of the page, you will find the This job is deployed to production message. GitLab recognizes that a deployment took place because of the job's environment section. Click the production link to move over to the production environment.

You will have an overview of all production deployments. There was only a single deployment so far. For each deployment there is a re-deploy button available to the very right. A re-deployment will repeat the deploy job of that particular pipeline.
Whether a re-deployment works as intended depends on the pipeline configuration, because it will not do more than repeating the deploy job under the same circumstances. Since you have configured to deploy a Docker image using the commit SHA as a tag, a re-deployment will work for your pipeline.
Note: Your GitLab container registry may have an expiration policy. The expiration policy regularly removes older images and tags from the container registry. As a consequence, a deployment that is older than the expiration policy would fail to re-deploy, because the Docker image for this commit will have been removed from the registry. You can manage the expiration policy in Settings > CI/CD > Container Registry tag expiration policy. The expiration interval is usually set to something high, like 90 days. But when you run into the case of trying to deploy an image that has been removed from the registry due to the expiration policy, you can solve the problem by re-running the publish job of that particular pipeline as well, which will re-create and push the image for the given commit to registry.
Next click the View deployment button, which will open http://your_server_IP in a browser and you should see the My Personal Website headline.
Finally we want to check the deployed container on your server. Head over to your terminal and make sure to log in again, if you have disconnected already (it works for both users, sammy and deployer):
- ssh sammy@your_server_IP
Now list the running containers:
- docker container ls
Which will list the my-app container:
Output
CONTAINER ID IMAGE COMMAND CREATED STATUS PORTS NAMES 5b64df4b37f8 registry.your_gitlab.com/your_gitlab_user/your_project/master:your_commit_sha "nginx -g 'daemon of…" 4 hours ago Up 4 hours 0.0.0.0:80->80/tcp my-app Read the How To Install and Use Docker on Ubuntu 18.04 guide to learn more about managing Docker containers.
You have now validated the deployment. In the next step, you will go through the process of rolling back a deployment.
Step 8 — Rolling Back a Deployment
Next you'll update the web page, which will create a new deployment and then re-deploy the previous deployment using GitLab environments. This covers the use case of a deployment rollback in case of a defective deployment.
Start by making a little change in the index.html file:
- In GitLab, go to the Project overview and open the
index.htmlfile. - Click the Edit button to open the online editor.
- Change the file content to the following:
index.html
<html > <body > <h1 > My Enhanced Personal Website </h1 > </body > </html > Save the changes by clicking Commit changes at the bottom of the page.
A new pipeline will be created to deploy the changes. In GitLab, go to CI/CD > Pipelines. When the pipeline has completed, you can open http://your_server_IP in a browser for the updated web page now showing My Enhanced Personal Website instead of My Personal Website.
When you move over to Operations > Environments > production you will see the newly created deployment. Now click the re-deploy button of the initial, older deployment:

Confirm the popup by clicking the Rollback button.
The deploy job of that older pipeline will be restarted and you will be redirected to the job's overview page. Wait for the job to finish, then open http://your_server_IP in a browser, where you'll see the initial headline My Personal Website showing up again.
Let's summarize what you have achieved throughout this tutorial.
Conclusion
In this tutorial, you have configured a continuous deployment pipeline with GitLab CI/CD. You created a small web project consisting of an HTML file and a Dockerfile. Then you configured the .gitlab-ci.yml pipeline configuration to:
- Build the Docker image.
- Push the Docker image to the container registry.
- Log in to the server, pull the latest image, stop the current container, and start a new one.
GitLab will now deploy the web page to your server for each push to the repository.
Furthermore you have verified a deployment in GitLab and on your server. You have also created a second deployment and rolled back to the first deployment using GitLab environments, which demonstrates how you deal with defective deployments.
At this point you have automated the whole deployment chain. You can now share code changes more frequently with the world and/or customer. As a result, development cycles are likely to become shorter, as less time is required to gather feedback and publish the code changes.
As a next step you could make your service accessible by a domain name and secure the communication with HTTPS for which How To Use Traefik as a Reverse Proxy for Docker Containers is a good follow up.
Source: https://www.digitalocean.com/community/tutorials/how-to-set-up-a-continuous-deployment-pipeline-with-gitlab-ci-cd-on-ubuntu-18-04
0 Response to "Gitlab Ci Do You Want to Continue"
Post a Comment